A complete heating system
Precon plug system: connections and controls for Welltherm
Explore the available Welltherm range, prices and ordering options. Opens in a new tab.
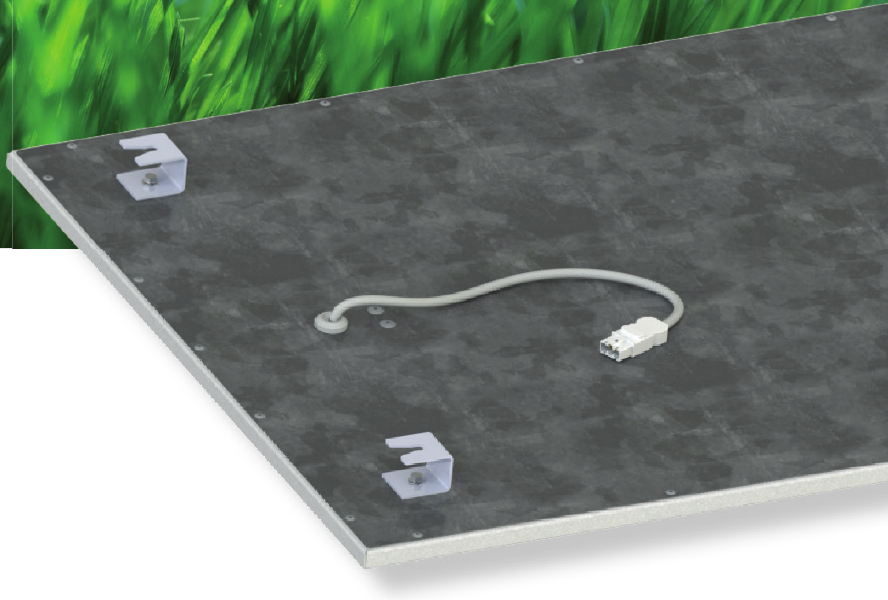
An infrared panel and its controls belong together. Our precon plug system makes that relationship practical: select the suitable connection, receiver and thermostat for your Welltherm panel.
The preassembled connection joins compatible components clearly. We coordinate the combination in advance so your heating plan includes the controls.
What is the precon plug system?
Current Welltherm panels with precon have a connecting cable with a GST15i3 connector. This is a system connection for compatible connecting components. The catalogue includes a cable with open ends, a cable with a Schuko plug and separate socket and plug components, among others. Which belongs in your installation depends on the panel, receiver and chosen electrical connection.
Panel, receiver and thermostat as one system
The thermostat measures temperature and manages heating demand. A compatible receiver switches the connected panel. A suitable programme adapts heating to the times you use the room. DE, SA and WT controls have their own connection options and functions: we select the combination that suits your installation.
Why do suitable controls matter?
Temperature controls mean you do not rely solely on manually switching heating on and off. You can set the desired temperature and, depending on the controls selected, a timed programme. Adaptive start and window detection are features of specific controls and combinations. We include only the functions available in your chosen system.
Precon and ecodesign requirements
European ecodesign rules for local space heaters and separate related controls are set out in Regulation (EU) 2024/1103. For the relevant combination, both the heater and required control functions matter. Precon supports our approach of supplying the panel with suitable controls. The connector alone does not determine whether the whole installation meets the requirements.
View Regulation (EU) 2024/1103 ↗
A clear connection arrangement for your project
For a renovation, bathroom, office or new heating plan, we discuss panel positions, connections and how you want to control the temperature. You receive a proposal for the components needed together. During installation, use the instructions for your specific panel and controls.
Which panels have precon?
Many current glass and metal panels have a 650 mm connecting cable with precon. Project heaters and other specialist products may have a different connection. Our product catalogue specifies the connection system for each series.
Current range
Welltherm Precon Connection Components
Choose the cable or connector associated with your panel and receiver. Suitable controls remain part of the system.
| Article | Version | Power output | Dimensions | Weight | Quotation |
|---|---|---|---|---|---|
| PC0001 | 500 mm; GST15i3 socket and open ends | — | — | — | Choose PC0001 |
| PC0010 | 1800 mm; GST15i3 socket and flat Schuko plug | — | — | — | Choose PC0010 |
| PC0100 | Three-pole GST15i3 socket | — | — | — | Choose PC0100 |
| PC0101 | Three-pole GST15i3 plug | — | — | — | Choose PC0101 |
Connection and application: Select the complete combination with receiver and temperature controls.
Connecting and pairing are two steps
The precon connection joins compatible electrical components. Wireless pairing of a thermostat and receiver is a separate step. First have the correct panel, cable and receiver combination connected. Then set the control functions and check that the intended panels respond to heating demand.
For a fixed connection, the open cable ends are connected by a suitable installer. A version with a Schuko plug uses a different connection method. We specify the required components in the quotation so it is clear which combination belongs to your panel. Connections and electrical loads are assessed for the entire installation.
Keep the receiver in its prescribed mounting position and ensure operation and checks remain possible. Follow both the panel manual and receiver instructions. A replacement component is selected by article code, protocol and load, not solely by connector shape. For your preparation, you can choose the appropriate control series.
Design a connection around your heating plan
Choosing our precon plug system starts with the room and controls you want to use. The system connects compatible electric heating components. This allows you to prepare the connections clearly, while a thermostat and any receiver manage heating demand. It is useful to consider these tasks separately. The plug connection provides the electrical link; the controls determine when a connected panel emits heat. Available output, installation and the component combination must be correct together.
First describe what you expect from the room. A bathroom used at set times needs a different programme from a study with changing workdays. In a living room, heating may operate longer and output must match heat loss. Supplementary heating instead concerns the location where you want additional comfort and how existing heating continues to operate. This information guides panel and control equipment selection. Precon then forms part of implementing that plan.
A practical sequence is to establish heating demand, choose suitable panels, decide how you want to control the rooms, then check connections. Starting solely with a connector may confuse a suitable physical connection with a complete working system. A receiver, for example, cannot necessarily work with every wireless thermostat. Controls with the same appearance need not belong to the same product series either. Article number, protocol and permitted load therefore matter more than a similar housing.
More about connections and controls
Identify the components in your proposal
Request a proposal identifying the panel, any receiver, controls and connection method separately. You can then see which component performs which function. A panel cannot infer your desired room temperature from its connector. A thermostat measures temperature and processes a setting. A receiver switches the connected load after receiving a suitable command. In other versions, certain functions may be combined in one appliance. Always assess the specific installation rather than applying a general diagram to every model.
Also record how many separate rooms you want to control. Three panels in one large room may respond together to one heating demand. Three panels in three rooms may have three different usage patterns. The number of panels therefore does not automatically tell you how many thermostats or receivers are needed. The chosen configuration must suit the zoning and appliances’ electrical capabilities. We help make these choices visible in a component overview.
Which details determine component compatibility?
For an existing panel, check the article code and rating plate. Record electrical output, connecting cable type and visible connector. Keep photographs of the rear and existing controls. A product photograph on a website may show a different production period or connection. We therefore use your own product details for expansion or replacement. The current catalogue shows the current version; your specific appliance’s manual determines how to connect and use that appliance safely.
Electrical assessment includes the combined output of the connected panels. A switching appliance’s permitted load is a limit for that component, not advice to load every installation up to that limit. The supply, cable, connection point and other appliances on that circuit also matter. Have an installer check the whole situation. A receiver model with a higher rated switching current does not resolve an unsuitable supply or an incorrect cable combination.
Compatibility checks also involve controls. Wireless appliances use a particular protocol. Our DE series uses X3D; the SA series uses ZigBee 3.0. These designations help select the correct family. A DE thermostat does not automatically make a usable combination with an SA receiver. The same applies to a gateway or app: an internet connection does not change appliance protocols. Select the complete route from controls to receiver and panel using the relevant series’ documentation.
Assess receivers by their own article codes
In the current DE series, receiver models differ in version and load. DE00010 is the premium version with a rated switching current of 16 A. DE00011 and DE00012 have a rated switching current of 10 A. These differences matter when checking a component list. Do not use the capacity of another model in the same family. An older brochure may also contain data for a former version. The current article number and accompanying instructions provide the correct basis for selection.
Our SA controls use ZigBee 3.0 at 2.4 GHz. The accompanying receiver has a rated switching current of 10 A. Treat the SA series as the specific combination described in our documentation. The general name ZigBee is not a promise that any arbitrary hub, app or control will work with it. If you require particular smart functions, we discuss beforehand which connection is actually available. You can then assess the desired controls before the installation is assembled.
Choose controls according to daily use
Simple controls may be sufficient when you use one room at set times. Set the desired temperature and adapt the programme to your day. For a home with several zones, specifying times and temperatures per room may matter more. Make this distinction before selecting additional functions. The value of controls lies in a practical programme matching your use and clear operation for the people who actually use the room.
Establish, for example, when your study is occupied. If you work from home on some days and elsewhere on others, the setting needs to follow that difference. Also discuss whether the room needs a particular background temperature between uses. A fixed low temperature or switching off completely is not universal advice: the building, moisture load, other heating and use determine what is suitable. A programme helps make considered choices; it does not guarantee a particular savings percentage.
For a bathroom, desired operating times, panel versions and installation location must be considered together. An electrical component must be suitable for its specific mounting position. Do not infer the permitted position of a receiver, control or connection point from the panel’s protection rating alone. The complete installation must be assessed. A panel with additional accessories or a lighting frame also adds separate components and instructions to the plan.
Specify app control beforehand
If you want to use an app, have the full system identified: control series, suitable gateway, controls and required connection. Ask which settings you can change remotely and which functions continue locally. A phone is not needed for every control system. The SA series should not be presented as a general app solution either. Available additional controls follow from the selected combination. This gives you an accurate picture of operation and any additional components.
Also discuss who needs access to settings. In a home, that may be one resident; an office may have someone responsible for the rooms. Give fixed programmes recognisable names and keep an overview of paired appliances. Clear settings make later changes easier to understand. If you change internet connection or want to replace an appliance, consult the relevant control series’ instructions for the correct next steps.
Prepare mounting and accessibility
A tidy connection requires space for components and later maintenance. Consider the power supply, receiver and any connections during design. Accessibility can be especially important above a suspended ceiling or behind a fixed finish. A component that can only be reached later by opening an entire finish deserves extra attention beforehand. Choose a version suitable for the supporting surface and the relevant products’ capabilities.
For recessed ceiling mounting, the structure must be suitable for the chosen panel and frame combination. Use that specific combination’s instructions for the cut-out, support and mounting. Dimensions or clearances from an older mounting brochure do not automatically apply to every new product. The same applies to a receiver positioned near the panel. Check its mounting instructions and ensure electrical components remain accessible according to the installation plan.
The available cable length may restrict connection positioning. Measure the actual route and record obstacles, such as a beam, fixed cupboard or planned ceiling structure. A straight line on a floor plan is not always the route a cable can follow in the room. Ask for advice on the correct version if the situation is unclear. Do not make arbitrary changes to a connection because a connector appears to fit at first glance.
The thermostat’s measurement position
A temperature reading must be useful for the zone you want to control. A measurement position in direct sunlight, near another heat source or in a cold air current may give a different picture from where you sit. Controls may consequently switch earlier or later than desired. Select the position according to the control’s instructions and room layout. First change measurement or operating conditions when they clearly differ, before permanently selecting a higher setting.
Direct radiant heat and measured air temperature are also different aspects of comfort. You may experience panel warmth while the room is still reaching temperature. A thermostat setting does not change the panel’s selected capacity. If the building loses more heat than the installation can deliver, another setting does not resolve that capacity shortfall. Assess positioning, output and controls together when the desired comfort is not achieved.
Pairing, testing and handover of the installation
Pair wireless components according to the specific series’ instructions. A general explanation or QuickGuide with a similar image does not replace the correct manual. Check product names on the document. In older document collections, a filename may give a different impression from the appliances actually described. The model on your component list and the instructions’ content must match.
After installation, test whether the intended zone responds to its own controls. Check a demand for heat and then its termination. Record which receiver belongs to which room. When preparing several rooms together, recognisable records prevent adjusting the wrong zone later. Also ask the installer to carry out electrical connection checks and other relevant inspections. The user does not need to open components for this.
Keep manuals and final settings with your product records. Include the programme, article numbers and zone layout in that overview. If someone else will use the controls, explain normal operations and the difference between a temporary change and adjusting the programme. This handover is a practical part of a complete installation. It also helps with later service enquiries or expansion requests.
Expand an existing installation
For expansion, start by inventorying what is already installed. List the panels, receivers and controls, and add original documentation if available. Specify which room is being added and whether you are enlarging an existing zone or adding a separate one. An additional panel in the same zone can affect both electrical load and positioning. A new room also brings a separate usage pattern.
For replacement, do not check only whether a connector fits. The new component may have a different function, load or control method. Even a current successor must be assessed within the whole installation. A previous resident’s installation or an old product photograph provides insufficient certainty. Good preparation distinguishes components that can remain from those requiring a new combination.
For advice, preferably send clear photographs of rating plates and existing controls, together with a floor plan and a description of the change you want. State whether the panels provide primary or supplementary heating. Also describe current problems or limitations, such as an inconvenient programme, a missing zone or a hard-to-reach connection. This lets us discuss product selection and the control question specifically.
What precon does and does not determine
The plug system contributes to a suitable connection between the components intended for it. It is not independent evidence that a complete installation meets every applicable requirement. Controls, product combination and implementation must also suit the instructions. Our current catalogue therefore describes panels together with suitable controls. Use that information as the starting point for the complete installation, without attaching a general conformity promise to a standalone connector.
Precon also does not determine a room’s consumption. Electricity use results from output and the time the panels actually heat. A programme can help limit unnecessary use, but the building’s heating demand remains. When assessing, preferably measure actual consumption using a suitable method. Some controls display a calculated indication based on settings or operating time; this is not automatically an independent kWh measurement.
A complete product selection clarifies components, controls and use. Explore our overview of thermostats and controls to compare options. For a concrete project, request a suitable heating proposal. We discuss your heating requirements and existing situation so panel, connections and controls work together.
Want to connect a panel with a plug? Also read our guide to Welltherm heating with a plug and check which connection and controls belong to your article.